
A living room can feel “high-end” without being high-cost. The trick isn’t buying the priciest items—it’s making smart choices that create balance, comfort, and a cohesive look. When you focus on layout, light, texture, and a few intentional upgrades, your space starts to look curated instead of random.
In this article, you’ll get practical, budget-friendly changes that make the biggest visual difference—plus simple rules that keep you from wasting money on things that won’t work in your room.
Start With a Clear Goal (So You Don’t Buy Random Stuff)
Before shopping, decide what you want the living room to feel like. Pick 2–3 words:
- Cozy and warm
- Bright and airy
- Modern and minimal
- Classic and elegant
- Creative and colorful
Then choose one “anchor” style direction. That doesn’t mean you can’t mix styles—it just means you’re not buying five different vibes.
A quick way to stay consistent: choose a color palette (more on that below) and a main material vibe (for example: wood + linen; black metal + leather; or light oak + white + natural textures).
Declutter First (Free Upgrade That Changes Everything)
The cheapest “makeover” is removing visual noise.
Try this 15-minute reset:
- Clear every surface (coffee table, TV stand, side tables).
- Put back only what you use daily.
- Choose 3–5 decorative items total for the whole room to start.
- Hide everything else in baskets, drawers, or a closet.
A room instantly looks more expensive when it has space to breathe.
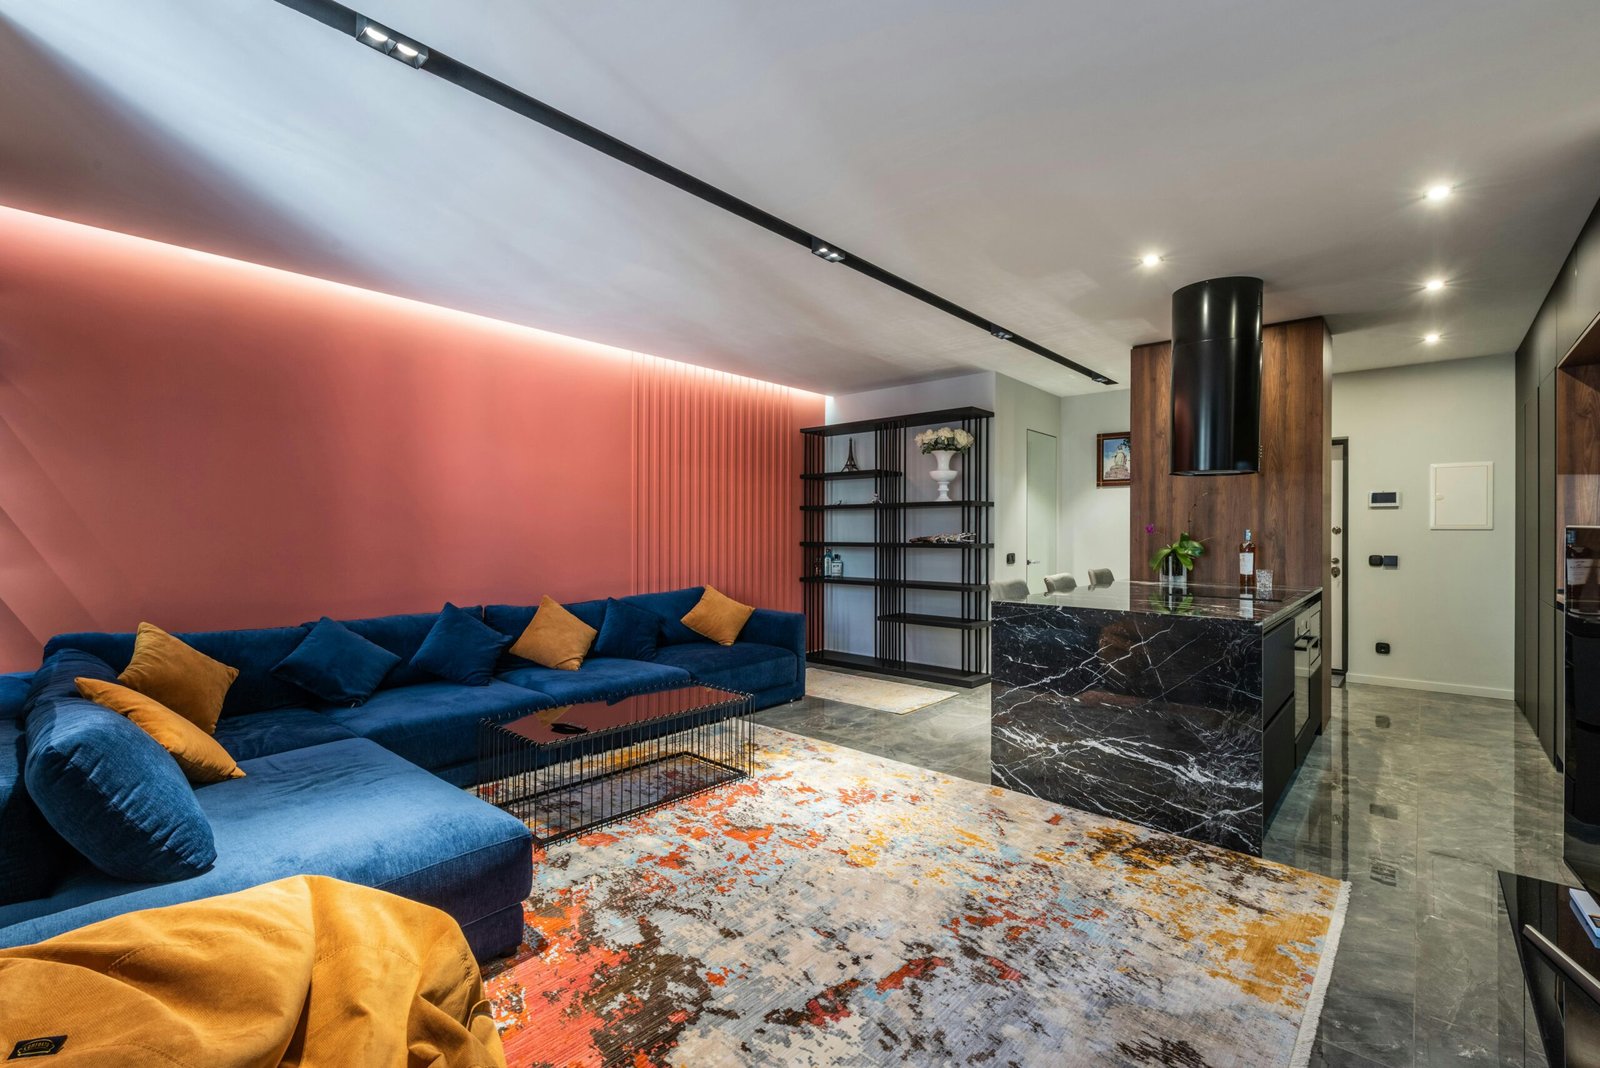
Choose a Color Palette That Always Works
A budget room can look messy when colors fight each other. A simple palette makes things look intentional, even if your items come from different places.
Use this easy formula:
- Base color (60%): walls + big pieces (white, cream, greige, light gray)
- Secondary color (30%): rug, curtains, sofa color, or large accent chair
- Accent color (10%): pillows, art, decor items (one or two accent colors max)
If you’re unsure, pick one of these reliable combos:
- Warm white + beige + black accents
- Light gray + white + navy accents
- Cream + tan + olive accents
- White + wood tones + terracotta accents
A limited palette is one of the fastest ways to make a room look polished.
Rearrange Your Furniture Like a Designer
Most living rooms look “off” because the layout isn’t helping the space.
Rule 1: Pull furniture off the walls (a little)
If everything is pressed against the walls, the room can feel like a waiting room. Try moving the sofa forward even 5–10 cm and create a more defined seating area.
Rule 2: Create a conversation zone
If people sit too far apart, the room feels cold. Make it easy for people to talk—chairs angled slightly toward the sofa, side tables within reach, and a rug anchoring everything.
Rule 3: Keep pathways clear
You want smooth walking routes. If you’re bumping into corners or squeezing around the coffee table, try a smaller table or a different shape (round can be amazing).
Rule 4: The TV doesn’t always have to be the “center”
If the TV is the focal point, soften it with decor: a console, baskets, a plant, or art near it to balance the wall visually.
Make One “Statement” Choice (Instead of Many Small Ones)
Instead of buying lots of cheap decor, invest in one strong visual anchor:
- A large rug
- A big piece of art
- Floor-to-ceiling curtains
- A bold lamp
- A standout coffee table (even secondhand)
One statement piece creates that “designer” feeling because it sets the tone. Everything else can be simple.
Upgrade the Rug (It Changes Everything)
If your rug is too small, the room looks unfinished. This is one of the most common mistakes.
Easy sizing guide
- Ideally, front legs of the sofa and chairs should sit on the rug.
- If your rug is small, place it under the coffee table and pull furniture slightly closer so it still feels like one zone.
Budget tips for rugs
- Look for flatweave rugs (often cheaper and easy to clean).
- Consider neutral patterns—they hide wear and look expensive.
- Layer rugs: a larger jute/sisal-style base + a smaller patterned rug on top.
If you can upgrade only one thing, a rug is a strong choice.
Curtains: The “Luxury” Trick That Costs Less Than You Think
Curtains make rooms look taller and more finished—if you hang them correctly.
The rule that makes it look expensive
- Hang curtains higher than the window (near the ceiling if possible).
- Let them go long (close to the floor, not floating mid-wall).
- Use panels that look full, not stretched thin.
Even affordable curtains look premium when they’re tall, long, and full.
Lighting: Use Layers (Not Just One Ceiling Light)
A single overhead light can make a room feel flat and harsh. A “designed” room uses layers:
- Ambient: ceiling light or soft overall glow
- Task: reading lamp near sofa/chair
- Accent: small lamp on a side table, LED behind TV, or a picture light vibe
Budget lighting upgrades
- Add one floor lamp and one table lamp.
- Choose warm bulbs (soft white) for cozy vibes.
- Use consistent bulb color temperature across the room.
Lighting doesn’t need to be expensive—it needs to be intentional.
Use Texture to Make Neutrals Look Rich
When you decorate with neutrals, texture becomes your “wow factor.” Texture makes a room feel layered and expensive.
Add a mix of:
- Linen-look pillows
- A knit or woven throw blanket
- A woven basket
- Wood (tray, frame, side table)
- A ceramic vase or bowl
Even if everything is beige/cream/white, it won’t look boring if textures vary.
Style Your Coffee Table Like a Pro
A cluttered coffee table looks messy. A styled one looks “magazine.”
Use the simple “3-layer” setup:
- Tray or large book (base)
- Something tall (vase with stems, candle holder)
- Something personal (small object, bowl, coasters)
Keep it functional. If you actually use the table daily, style a small section and leave the rest open.
Art That Looks Expensive (Without Spending a Lot)
Blank walls can make a room feel unfinished. But lots of tiny frames can look chaotic. Aim for fewer, larger pieces.
Budget art ideas that work
- One big poster print in a simple frame
- A DIY canvas (abstract shapes with 2–3 colors from your palette)
- Black-and-white photography prints
- A set of 2–3 matching prints arranged neatly
Sizing tip
Art should feel proportionate to the furniture. Over a sofa, a good goal is art that’s about two-thirds the width of the sofa (or a gallery layout that fills a similar area).
Add Greenery (Instant Life)
Plants make a room look cared-for. Even one plant helps.
If you’re keeping it low-maintenance:
- Choose one medium plant near a window.
- Use a simple pot that matches your palette.
- If you don’t want real plants, use high-quality faux greenery sparingly (one larger piece can look more real than many small ones).
Create “Zones” in the Living Room
If your living room shares space with dining or an entry area, zones make it look designed.
Easy zoning tools:
- Rugs
- Lighting (a lamp defines a corner)
- A slim console table behind a sofa
- A bookshelf as a subtle divider
Zones make a space feel intentional, even if it’s small.
Secondhand Finds: What’s Worth Buying Used
Buying secondhand is one of the best ways to decorate on a budget, but choose wisely.
Great secondhand targets:
- Solid wood side tables
- Coffee tables
- Vintage lamps (replace shade if needed)
- Frames and mirrors
- Accent chairs (if structurally strong)
Things to buy new (often worth it):
- Pillows (for hygiene + freshness)
- Curtains (if you want a crisp look)
- Rug pads (comfort + safety)
Small Details That Make the Room Feel “Done”
These little changes add up:
- Match metals (don’t mix five finishes). Pick 1–2: black, brass, chrome, etc.
- Use a consistent wood tone direction (warm wood vs cool wood).
- Hide cords when possible (clips or cord covers).
- Add one signature scent (candle or diffuser) for a cozy atmosphere.
- Keep surfaces mostly clear, with a few intentional pieces.
A Simple Budget Makeover Plan (You Can Do This Weekend)
If you want a step-by-step plan:
- Declutter surfaces and floors.
- Rearrange furniture for better flow.
- Choose a palette (base + secondary + accent).
- Add curtains higher and fuller (if possible).
- Add at least two light sources (lamp + lamp).
- Style coffee table and one shelf only (start small).
- Add one plant or greenery focal point.
- Hang one large art piece or a neat set of prints.
You’ll be surprised how different the room feels without buying a ton.
The “Looks Expensive” Checklist
Before you call it done, check:
- Does the room have a clear color palette?
- Is the rug big enough to anchor seating?
- Are curtains hung high and long?
- Do you have layered lighting?
- Are surfaces decluttered and styled simply?
- Do textures vary (not all smooth or all fluffy)?
- Does one statement piece lead the design?
If you can say “yes” to most of these, your living room will look elevated—on a real-world budget.
Lighting 101: How to Make Any Room Look Better
Lighting is one of those things people underestimate until they see the difference. The same room can look cozy, stylish, and expensive—or harsh and awkward—depending on how it’s lit. The best part: you don’t need a full renovation to transform lighting. You need a plan.
This guide will help you understand the types of lighting, how to layer them, what bulbs to choose, and where to place lamps so every room looks more flattering and functional.
Why Lighting Matters More Than You Think
Lighting affects:
- Mood (calm vs energetic)
- How colors look (warm vs cold tones)
- How big the room feels
- Whether the space feels “finished”
- How comfortable it is to live in the room
If your room feels dull, smaller than it should, or “not cozy,” lighting is usually a major reason.
The 3 Layers of Lighting (The Designer Secret)
Good lighting isn’t one bright ceiling light. It’s layers.
1) Ambient lighting (overall light)
This is the base illumination—what helps you see generally.
Examples:
- Ceiling fixtures
- Recessed lights
- A large floor lamp that lights most of the room
2) Task lighting (functional light)
This is focused light for specific activities.
Examples:
- Reading lamp by a chair
- Desk lamp for a home office
- Under-cabinet kitchen lights
3) Accent lighting (mood + style)
This highlights objects and creates atmosphere.
Examples:
- Small table lamp on a console
- Light behind the TV
- Picture light or wall sconces
- LED strips used subtly
When you have at least two of these layers in a room (ideally all three), it instantly looks more “designed.”
The Biggest Lighting Mistake: Using Only the Ceiling Light
A single overhead light can create:
- Harsh shadows under eyes and furniture
- Flat, boring atmosphere
- A “cold” feeling—even with warm decor
Instead, treat overhead light as optional. In many living rooms, people rarely need it once lamps are set up well.
Choosing Bulbs: Warm vs Cool (And What to Pick)
Bulbs have “color temperature.” You don’t need to memorize numbers to get it right, but you do need consistency.
Warm light
Feels cozy and relaxing. Great for:
- Living rooms
- Bedrooms
- Dining areas
Neutral light
Balanced, clean. Great for:
- Kitchens
- Bathrooms (especially around mirrors)
- Home offices
Cool light
Feels bright and clinical. Usually better for:
- Garages, utility spaces
- Task-heavy areas where you want maximum clarity
Most homes look best when you avoid very cool, blue-toned lighting in cozy spaces.
One Room, One Lighting “Mood”
A common issue is mixing bulb tones. You might have a warm lamp and a cool ceiling light—your room looks “off” even if everything else is nice.
Try to keep bulbs in the same family within the same room:
- Warm + warm
- Neutral + neutral
If you mix, do it carefully (for example, neutral in the bathroom but warm accent lighting elsewhere).
How Many Lamps Do You Need?
A simple guideline:
- Small room: 2 light sources minimum
- Medium room: 3 light sources
- Large room: 4+ light sources, spread out
Light sources include lamps, sconces, LED accents, and ceiling fixtures.
In a living room, a great starting combo is:
- 1 floor lamp
- 1 table lamp
- optional accent light (small lamp on a shelf or LED behind TV)
Placement Rules That Instantly Improve Lighting
Rule 1: Spread light around the room
If all the light is in one corner, the room feels uneven.
Place lamps so light comes from multiple directions:
- One near seating
- One near a wall or console
- One near a reading spot
Rule 2: Use lamps at different heights
If every lamp is the same height, the lighting looks flat.
Mix:
- Floor lamp (tall)
- Table lamp (mid)
- Small accent lamp (low)
Rule 3: Light the walls, not just the center
When walls are softly lit, the room feels bigger and more inviting.
A floor lamp that throws light upward or a lamp near a wall can do this well.
Lampshades Matter (A Lot)
The shade controls how light spreads.
- White/cream shades: softer, brighter glow
- Dark shades: moodier, more dramatic
- Fabric shades: cozy and warm
- Metal shades: focused light, great for task lighting
If your lamp feels too harsh, the shade may be the problem—not the bulb.
Easy Lighting Upgrades That Look High-End
Add a dimmer effect without rewiring
Use smart bulbs or plug-in dimmer adapters for lamps. This lets you set mood lighting for evenings.
Swap one “builder basic” fixture
Changing one ceiling fixture can upgrade the whole room. Choose something simple, proportional, and not overly trendy.
Use matching bulbs
This is simple but powerful. Consistent bulb tone makes everything feel intentional.
Add a picture light vibe
If you have art, you can add a small light above it (or a directional lamp aimed toward it). Instantly elevated.
Lighting for Each Room: Quick Guides
Living room
Goal: cozy, layered, flexible
Best setup:
- Floor lamp near sofa
- Table lamp on side table or console
- Accent light (small lamp, shelf light, or LED behind TV)
Avoid:
- Only overhead light
- Super cool bulbs
Bedroom
Goal: calm, soft, restful
Best setup:
- Two bedside lamps (or one lamp + wall sconce)
- Warm bulb tones
- Optional soft accent light (tiny lamp or subtle LED)
Tip:
Put lamps on both sides if possible—it feels balanced and more “hotel-like.”
Kitchen
Goal: functional, bright, clean
Best setup:
- Bright ambient lighting
- Under-cabinet lights for counters
- Pendant lights over island (if you have one)
Tip:
Neutral lighting helps you see true colors when cooking.
Bathroom
Goal: flattering, clear, practical
Best setup:
- Light around the mirror (not only overhead)
- Neutral bulbs for accuracy
- Optional warm accent for spa vibes (like a small lamp on a safe shelf if space allows)
Avoid:
A single overhead light casting shadows on your face.
Home office
Goal: focus + comfort
Best setup:
- Desk lamp aimed at workspace
- Ambient light to avoid a bright-only desk zone
- Keep screen glare in mind
Tip:
Place a lamp behind you or to the side so you’re not working in a dark room with a bright screen.
How to Make a Dark Room Feel Brighter
If a room doesn’t get much natural light:
- Use lighter curtains and keep them open during the day
- Place a lamp near a wall to bounce light
- Add a mirror opposite or near a light source
- Choose warm-to-neutral bulbs that are bright enough
- Use reflective touches: glass, light wood, soft metallic accents (not too many)
Sometimes it’s not the room—it’s the lighting strategy.
How to Make a Bright Room Feel Cozier at Night
If your room feels too bright or harsh at night:
- Use multiple lamps instead of one strong light
- Add dimmable bulbs or lower-watt bulbs in accent lamps
- Choose warm bulb tones
- Add a soft light in a corner that you can turn on in the evening
- Use fabric shades for a gentle glow
The goal is soft pools of light, not a single bright flood.
The “Good Lighting” Checklist
Use this to fix a room fast:
- Do you have at least 2 light sources?
- Are lights spread around the room (not only one corner)?
- Are bulb tones consistent?
- Do you have at least one lamp at seating level?
- Do you have at least one light that gently hits a wall?
- Can you create a softer mood for evenings?
If you improve even 3 of these, the room will look noticeably better.
A Simple Shopping List (Budget-Friendly)
If you’re starting from scratch, this works in most living rooms:
- 1 floor lamp (for ambient + height)
- 1 table lamp (for cozy glow near seating)
- 2 matching warm bulbs
- 1 extension cord or cable clips (for neat setup)
You don’t need to buy everything at once. Add one lamp first and feel the difference—then build layers.

Isabella Garcia is the creator of a blog dedicated to crafts and home care, focused on making everyday life more creative, organized, and enjoyable. The blog shares practical tips, easy DIY projects, home organization ideas, and simple solutions to take better care of your living space. Whether you’re a beginner in crafting or someone looking for inspiration to improve your home routine, Isabella’s blog offers clear, useful, and hands-on content to help you create a cozy, beautiful, and well-cared-for home.